Y1 RS Recording Tips
Turning on the device:
On the left hand side (as it faces you) of the device, there is a slider switch labeled “Hold | Power”. Slide this switch to the down position for 2 seconds and you will see the word “Olympus” across the display screen. Release the slider.
NOTE: If the slider gets pushed to the top position it will “Lock” the buttons on the device. You will not be able to record until the slider is moved back to the middle position.
Settings:
In the event the device loses power for an extended time you may need to reset the recorders settings. You will know when you need to do this as the recorder will prompt you once it’s turned on. The settings should be set as follows;
- Battery: Ni-MH
- Date and Time: Set accordingly
- Press and hold the “OK Menu” button
- Press the down arrow to the microphone icon to get to the record menu
- In the Record menu, press down to highlight “Rec Mode” and hit OK. Verify recording mode is set to MP3.
Recording a session:
After turning on the device, press the button with the red circle to start a recording. To stop the recording press the “Stop” button.
NOTE: Pressing the red circle a 2nd time will “Pause” a recording. This is an option if a faculty member chooses to take a break, but should NOT be used between resource sessions as pausing does not create a new file. Each resource session should have its own file.
Recovering recordings:
The recorder also acts as a USB flash drive. On the left hand side (as it faces you) is a slider near the bottom of the device. Slide this down to expose the USB plug and plug into your computer. Navigate to the following folder, Recorder->Folder-A. Inside of that folder, you will find a file labeled “WS######”. Rename this file to the following “presenter’s last name – date.mp3” (ex. smith-8-3-17.mp3).
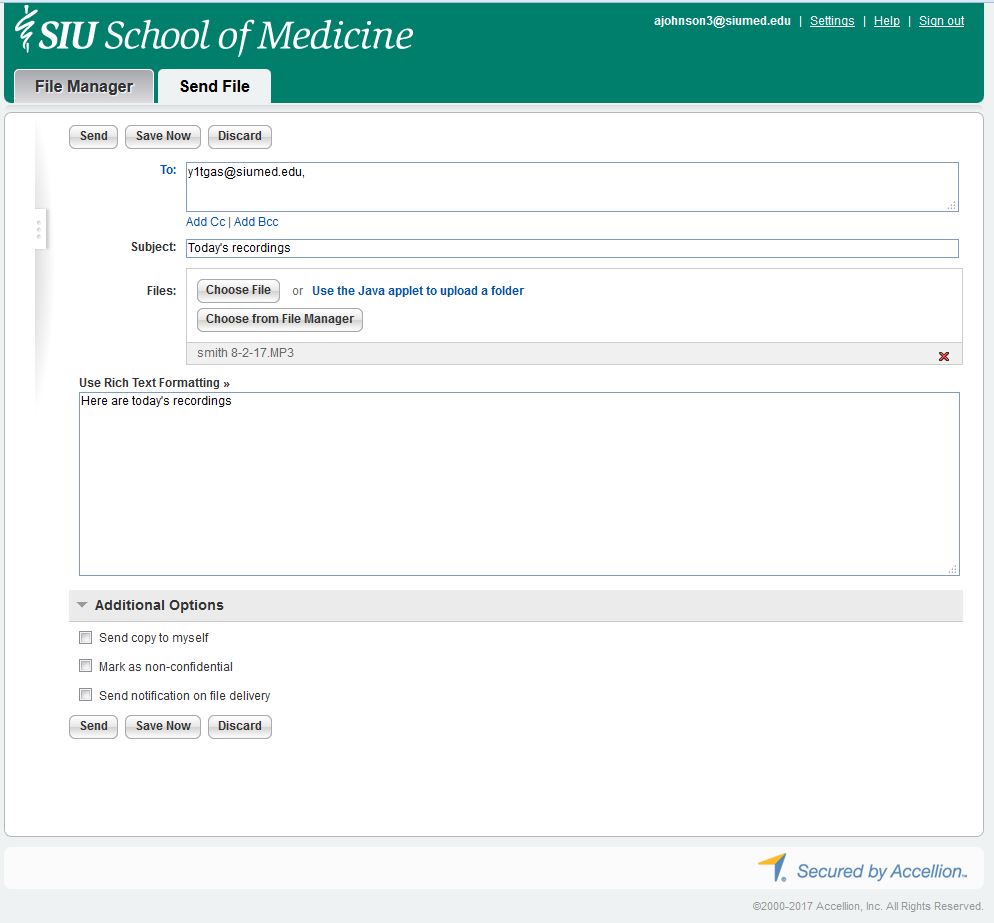
Sending files to OEC to be published in D2L:
The mp3 files will be sent to OEC though the SIUMED large file transfer page.
To send a message
- Open a web browser and navigate to http://share.siumed.edu
- Log in with your @siumed.edu email address
- In the “To:” box, enter y1tgas@siumed.edu
- In the “Subject” box, enter a suitable subject.
- To upload files click the “Choose File” button. Navigate to your file(s) and select the files you wish to submit.
- Include any details you would like in the box labeled “Use Rich Text Formatting”. This box will be the body of the email that is sent to y1tgas.siumed.edu.
- There are three check boxes under Additional Options. None need to be checked, but can be if you choose.
- Send copy to myself – will send a copy to your @siumed.edu email address.
- Mark as non-confidential – will mark the message to the receiver as non-confidential.
- Send notification of delivery – will send you a confirmation email once OEC staff members have downloaded the file you have sent.
Example of what screen should look like.
Deleting files from the recording device:
As mentioned in “Recovering recordings”, the recorder also acts as a flash drive. To remove files from the recorder, delete them from the “Folder-A” in the same manner as you would delete a file from a jump drive.
Notes:
Questions concerning the functionality or recording process should be directed to Information Resources/SOM IT (Lindegren Hall Rm 103, ircrequests@siumed.edu, 453-1514)
Questions concerning replacement batteries, microphones, and equipment loans should be referred to the Sarah Merideth in OEC (Lindegren Hall Rm 132c, smerideth@siumed.edu , 453-1673)